
How to Set Up ShipHawk for Magento
ShipHawk seamlessly integrates an automated and intelligent shipping solution directly into eCommerce storefronts.
A detailed discussion of the benefits of integrating ShipHawk’s shipping-automation solution into the Magento platform can be read in the post, How ShipHawk Works With Magento. This post walks through setting up ShipHawk from within Magento. Extensions for Magento 1 and Magento 2 are available.
Setting Up ShipHawk’s Plug-and-Play Solution from within Magento
1) Download and Install the ShipHawk Magento Extension
From the Magento server, download the ShipHawk extension and follow the instructions to install it into your Magento account.
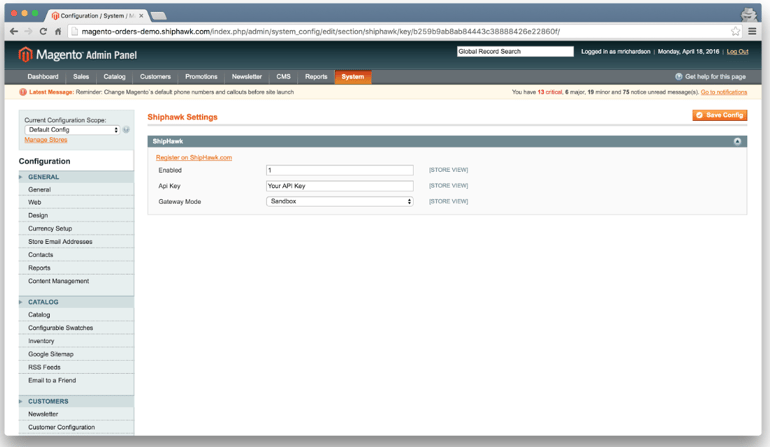
After installation, you’ll be able to see the “ShipHawk Settings” screen on the Magento admin panel.
2) Set Up Your ShipHawk Account
If you already have a ShipHawk account, you can start by logging into your account here. Once you navigate to your settings page, select the eCommerce settings from the sidebar and look for the Magento-specific section. You can then begin plugging in details which will enable the Magento and ShipHawk systems to communicate. These details include:
- Username
- Your store URL (into your ShipHawk portal)
- Magento API key (which you’ll create in Magento)
If you do not already have a ShipHawk account, you can go to shiphawk.com/request-demo to speak to an expert about creating an account.
3) Configure Your ShipHawk Magento Settings
After you’ve installed the ShipHawk extension on the Magento server (and set up a ShipHawk account), you can now establish your system’s settings, such as:
- Setting your gateway mode -- “live,” if you are ready to activate the ShipHawk solution in your store, or “sandbox,” if your store is in development
- Plugging in your API key
- Enabling or disabling your ShipHawk extension as necessary -- set the field to “1” to enable the extension in your store, and to “0” to disable it at any time
Start Using ShipHawk in Your Magento Store
After you’ve completed the steps above, you will be ready to use ShipHawk’s shipping-automation solution in your Magento store.
Once you’ve inputted your details, ShipHawk will begin automatically syncing your product data with the Magento platform — this data includes:
- SKU numbers
- Products names and descriptions
- Product weight*
When ShipHawk has synced the product details, the solution will provide accurate in-cart ratings in Magento.Then, once you’ve plugged in the above data, allowing Magento and ShipHawk to communicate, ShipHawk will begin taking in and processing new orders you receive in your Magento store.
Each time you receive an order through Magento, ShipHawk will automatically review the order’s details against your policies and shipping rules to identify and select the best options for the shipment — based on cost, service level, carrier performance, time in transit, optimal box and packing materials, etc..
ShipHawk will then send out a file for the order and create a new “Shipment” record in Magento, which will have a tracking number as well as any reference numbers that are associated with the shipment. You will be able to review all of this information directly in your Magento platform — and you won’t have to leave Magento to visit your ShipHawk portal!
*Magento requires dimensions to be entered manually using Magento’s meta-fields.
Still have questions?
Watch our ShipHawk + Magento video or speak with a shipping-automation expert today!